Did you repair that one & could you post any steps you took one of mine is out so I'm thinking of fixing it myself ..cheers..
Yes I did. It took most of the weekend. I was going to fix the led board but damaged it on way out so decided to replace with LEDs. These were the steps. Pictures to follow.
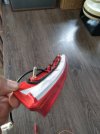
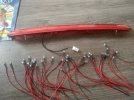
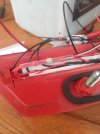
1. Cut out old strip. I did not separate the 2 parts of the light unit.
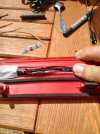
2. Make LED holders from stiff plastic and placed LEDs once wires were bent through 90 degrees at the base of the LEDs.
3. Make LED supports from stiff plastic to hold LEDs in place. This formed a small channel at the back of the LEDs.
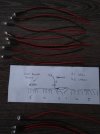
4. Solder all 21 LEDs (42 wires) using cold solder joints. (Made it up as I went along see pictures for wiring diagram.)
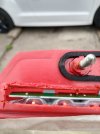
5. Connected all groups of LEDs together and to incoming 12 v.
6. Squashed wires flat in channel and sealed it all back up with electrical tape.
Advantages are that I can now change individual LEDs in future.
Disadvantage. The time it took but what else is there to do in Lockdown.


 That's the kind of person I am...